
>WIFI_HACKING_
//Rogue Access Point\\

Humans are always the weakest link when it comes to security. It's always the better option than
trying to bypass any type of firewall.
Here is how an attacker can gain your wifi password.
How often would you say that you update the firmware to your router? If you have no
idea what that even means, then you're a perfect target for an attacker. When you're
connected to your wireless network, an attacker could see what wireless WAP you are
connected to by it's ESSID (Mac Address -> a special ID given to PCB's after being
manufactured). Once they have that discoverd, they'll attempt to create a Rouge AP.
A Rouge AP is an AP (Access Point) created by the attacker to replicate the AP that
you are connected on.
They'll Duplicate the SSID (name of your WAP: "My wireless network"), and send a bunch of
Deauthentication
Packets to your router, forcing you off of your network. And since they've basically recreated
your WAP, and you can't connect to your original "My wireless network" due to being kicked from
the attacker, your device is automatically trying to connect back to it, but will end up
connecting
to the attackers "My wireless network" WAP instead.
 Why does this happen? It's the same reason why your phone will automatically connect to your
wifi
as soon as you get home without having to manually recconnect to the WAP. Your phone is
constanly
shouting out all previous WAP's that its been connected to to try and get an answer back, to
successfully establish a connection (Handshake)
Why does this happen? It's the same reason why your phone will automatically connect to your
wifi
as soon as you get home without having to manually recconnect to the WAP. Your phone is
constanly
shouting out all previous WAP's that its been connected to to try and get an answer back, to
successfully establish a connection (Handshake)
 Once the vitcim is connected to their WAP, they'll have set up a web server that may look like
you
routers settings page (if they can find the manufacturer from the MAC address), They'll have you
come
to a page; If you have a TP-Link router, it that may look like this:
Once the vitcim is connected to their WAP, they'll have set up a web server that may look like
you
routers settings page (if they can find the manufacturer from the MAC address), They'll have you
come
to a page; If you have a TP-Link router, it that may look like this:
 But imagine having an extra message above the login stating: "Firmware for your device is
outdated! Please
Login to Install Updates." and without hesitation, you enter your credentials, sending your wifi
password to the attacker.
But imagine having an extra message above the login stating: "Firmware for your device is
outdated! Please
Login to Install Updates." and without hesitation, you enter your credentials, sending your wifi
password to the attacker.
Let's look at how a similar attack can be done:
Build a Pumpkin Pi -- The Rouge AP & MITM Framework That Fits in Your Pocket
A man-in-the-middle attack places you between your target and the internet, pretending to be
a
Wi-Fi network while secretly
inspecting every packet that flows through the connection. The WiFi-Pumpkin is a rogue AP
framework to easily create
these fake networks, all while forwarding legitimate traffic to and from the unsuspecting
target.
Today, we'll learn to set up this framework on a low-cost Raspberry Pi running Kali Linux.
You
may want to look into getting
a Raspberry Pi 3 kit or Raspberry Pi 3 B+ kit for this guide. If you already have one,
great,
let's go!
On the Raspberry Pi 3 running Kali Rolling, some Kali Linux tools can be broken out into
standalone, almost disposable devices.
One perfect example is the WiFi-Pumpkin, an attack framework for creating rogue access
points to
stage man-in-the-middle (MitM) attacks.
This allows an attacker to lure victims to their evil access point and begin monitoring
internet
traffic, effectively
seizing control over the flow of data to any connected victims.
When to Use the WiFi Pumpkin
The WiFi-Pumpkin is a great tool to use when you can bridge an existing Ethernet or Wi-Fi
connection, serving
internet access to anyone willing to connect to an open network without asking too many
questions. It comes stuffed
with features, including rogue Wi-Fi access points, deauth attacks on client APs, a probe
request and credentials
monitor, transparent proxy, Windows update attack, phishing manager, ARP Poisoning, DNS
Spoofing, Pumpkin-Proxy,
and image capture on the fly.
Wireless probe frames can reveal networks a phone or laptop is probing for. One way we can
use
the WiFi-Pumpkin
is to monitor probe frames and create a network in response. We can use the WiFi-Pumpkin to
conduct a "Karma"
attack and create a network with the same SSID that the target device is expecting,
or has connected to before.
The name of your network will have a significant effect on how people interact with it. If
you
are in a crowd,
creating a network with names like "Starbucks" can cause a startling number of devices to
connect to you in under
a minute. Be creative in how you trick users into connecting to your evil AP. When you want
precision control over
the various elements of a man-in-the-middle attack, the WiFi-Pumpkin's easy GUI is
straightforward
enough for most beginners to grasp.
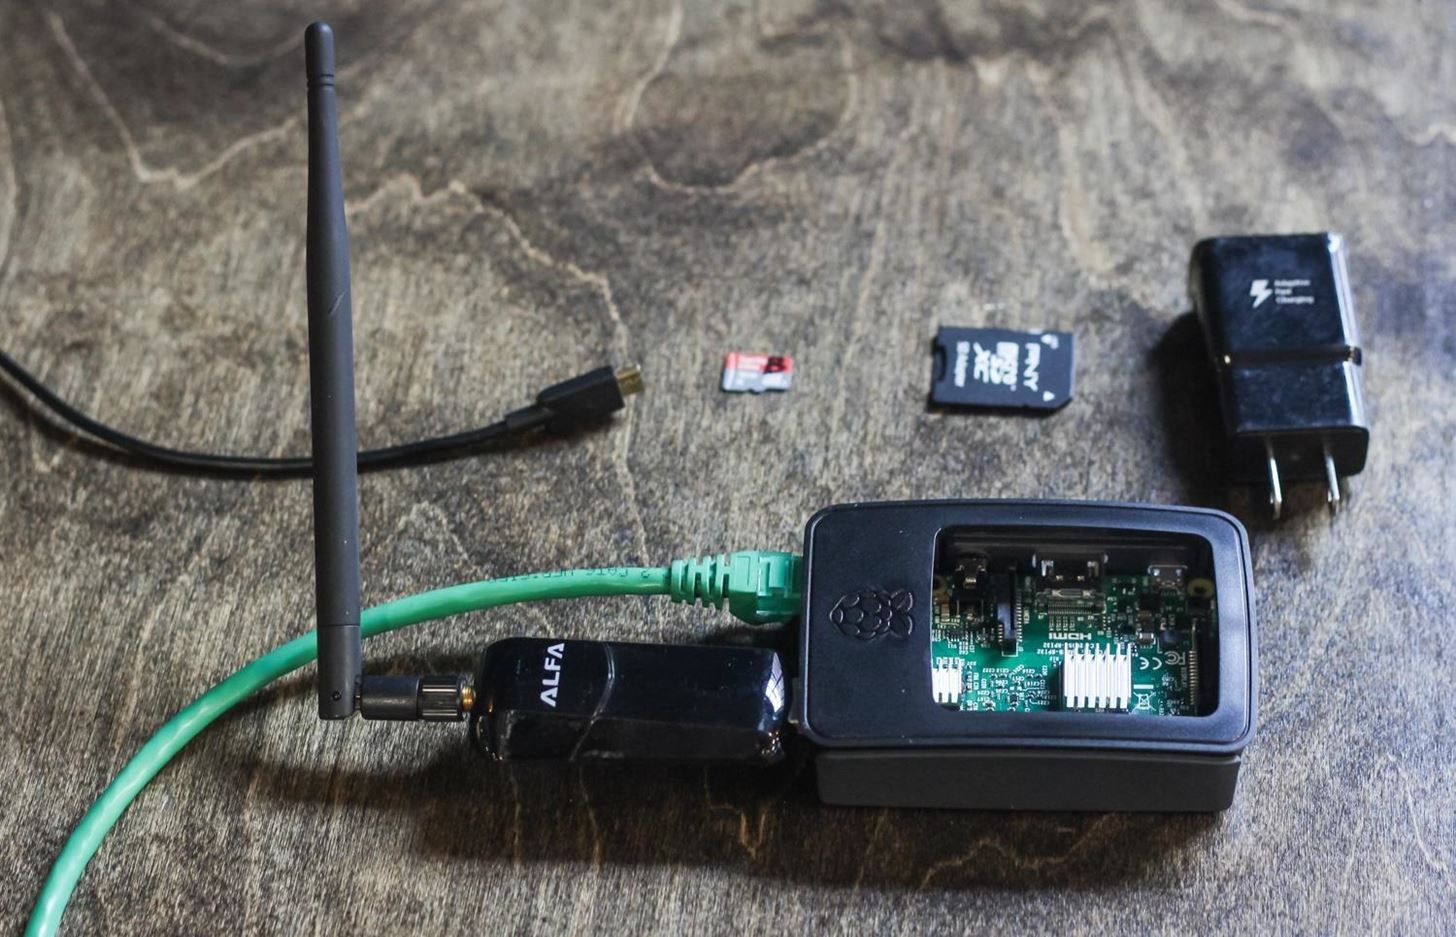
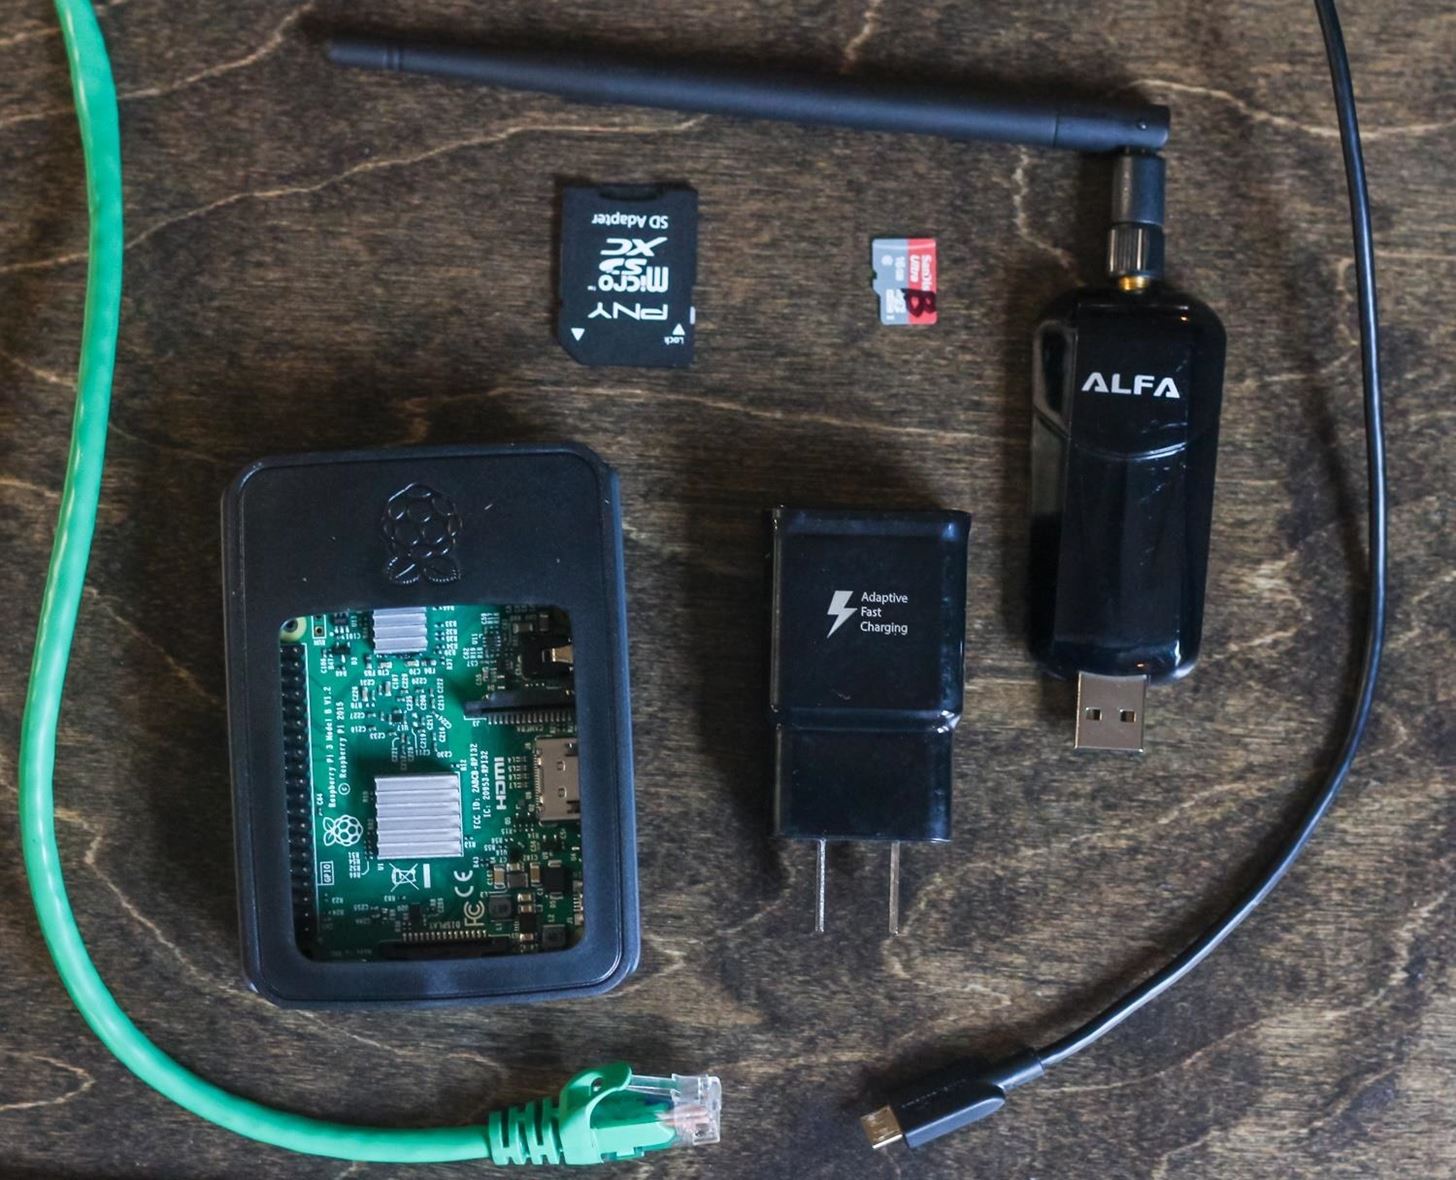
What you'll need to get started
The setup to create a WiFi-Pumpkin is minimal and requires only a few components.
To
put
this together,
you'll need the following:
- - Wireless network adapter -
- - Ethernet cable -
- - Raspberry Pi 3 or 3 B+ -
- - microSD card -
- - Power source -
- - USB keyboard/mouse interface -
- - SD card adapter -
- - Laptop to load files on the SD card -
Installing & Running WiFi-Pumpkin (Kali Linux)
As before any new install, ensure that your system is fully updated. WiFi-Pumpkin will
require
that you have an up-to-date Python installed on your machine.
> sudo apt-get update
WiFi-Pumpkin has a number of dependencies you will need to have installed before it can run
smoothly. Install the following if you don't
already have them on your Kali-Pi.
- Step 1: Install Dependencies -
Python's package manager, Pip, will help us manage the rest of the installation. To install
it
on
Kali Linux, run the following commands.
> sudo apt-get install -y python-pip
The next three dependencies will allow WiFi-Pumpkin to verify certificates, add HTTP layer
support, and intercept and inspect traffic flows.
Install each as shown below.
- > pip install service_identity
- > pip install scapy_http
- > sudo apt-get install mitmproxy
- Step 2: Install WiFi-Pumpkin -
Download WiFi-Pumpkin by cloning the GitHub repository:
> sudo apt-get install -y python-pip
Then go inside the folder:
> cd WiFi-Pumpkin
And change the permission of the installer file:
> chmod +x installer.sh
And then run the installer by entering the following:
> ./installer.sh --install
This may take a little time, during which you can go grab a cookie.
- Step 3: Run WiFi-Pumpkin -
When it's complete, run WiFi-Pumpkin by simply entering the following:
> sudo wifi-pumpkin
You're ready to get started creating fake APs

* Some Considerations with the WiFi-Pumpkin *
Keep in mind, in order for WiFi-Pumpkin to work, you will need to have access to at least
one
Kali Linux compatible wireless adapter with AP/Monitor mode support.
You will need your Pi to be connected to the internet while also capable of monitoring
wireless
traffic around you.
You can achieve this by using one wireless network adapter and your Pi's internal Wi-Fi card
in
tandem or a wired Ethernet connection and one
wireless network adapter. In the case your particular Pi isn't Wi-Fi capable, you'll need
two
wireless network adapters.
If you are unsure if the wireless adapter you have supports AP/Monitor mode, you can check
in
terminal with iw list.
If there is an "AP" in the list of "Supported interface modes," then your device supports
it.